Documentation Index
Fetch the complete documentation index at: https://domoinc-jkreitzman-patch-1.mintlify.app/llms.txt
Use this file to discover all available pages before exploring further.
Intro
Sage Intacct helps you manage financials on your own terms with cloud-based accounting software. With Domo, stakeholders can visualize Sage Intacct data together with data from any other system in a real-time dashboard. That means fewer reports for finance and better insights all around.Once your data is in Domo, connect easily to your data and create powerful, dynamic visualizations. Get the up-to-date information you need to make smart decisions on cashflow, ledgers, accounts receivable, accounts payable, journals, P&L, and more. Get real-time alerts via email and text when Sage Intacct metrics hit your predefined levels. Use Domo’s Sage Intacct Connector to retrieve data relating to customers, accounts, invoices, payments, expenses, and the like. To learn more about the Sage Intacct API, visit their page (https://developer.intacct.com/). You can connect to your Sage Intacct account in the Data Center. This topic discusses the fields and menus that are specific to the Sage Intacct Connector user interface. To add add DataSets, set update schedules, and edit DataSet information, see Adding a DataSet Using a Connector.
Note: The Sage Intacct Connector only imports standard reports. Within your Sage Intacct account you can create custom reports, set them to run on a schedule and have them delivered in a CSV format to a cloud storage service. Sage Intacct supports Dropbox, Box, Google Drive, and Amazon S3.Once delivered there customers can use the relevant Domo connector to import the custom report from the cloud storage service into Domo.
| Primary Use Cases | This connector is appropriate for pulling financial reporting and accounting, sales, and inventory data. |
| Primary Metrics | - Cashflow - Ledgers - Accounts receivable - Accounts payable - Journals - Profits and loss |
| Primary Company Roles | - CFO - Accountant - Sales - Inventory |
| Average Implementation Time | Connector runtimes vary based on data, but generally it should take between 2 and 8 hours. |
| Ease of Use (on a 1-to-10 scale with 1 being easiest) | 7 |
Best Practices
Keep date ranges reasonable. If you only need the last quarter, do the last quarter; if you need the last three years, do all three years. For Custom report, this Connector only supports ‘current month’ and ‘current year’ as the reporting period values. There might be a possibility of having other/additional supported values for Reporting Period. Contact Sage Intacct for other possible Reporting Duration values for filtering the data.Prerequisites
To connect to your Sage Intacct account and create a DataSet, you must have the following:- The user ID for your Sage Intacct account. This is the same user ID you use to sign into the Sage Intacct cloud ERP software.
- The password for your Sage Intacct account. This is the same password you use to sign into the Sage Intacct cloud ERP software.
- Your Sage Intacct company ID. This ID is usually different for sandbox and production accounts. To locate the Company ID in Sage Intacct, hover over Company and click Company Info. Company ID is found in the ID field.
- (Optional) You can also provide a Location ID. This may help narrow your data request to a specific location. To locate the location ID in Sage Intacct, hover over Company and click Locations. Select a Location ID from the report.
- (Optional) Max Concurrent Connections. This is a number value for the maximum number of concurrent connections that Sage Intacct allows for your account. If you have increased your API rate limits with Sage Intacct, you can provide how many concurrent connections you are allowed here.
- Additionally, the Customer may need to add “Domo” as an authorized sender ID in their company configurations Security tab.
Connecting to Your Sage Intacct Account
This section enumerates the options in the Credentials and Details panes in the Sage Intacct Connector page. The components of the other panes in this page, Scheduling and Name & Describe Your DataSet, are universal across most connector types and are discussed in great detail in Adding a DataSet Using a Connector.Credentials Pane
This pane contains fields for entering credentials to connect to your Sage Intacct account. The following table describes what is needed for each field:| Field | Description |
|---|---|
| User ID | Enter your Intacct user ID. See “Prerequisites” for more details. |
| Password | Enter your Intacct password. See “Prerequisites” for more details. |
| Company ID | Enter your Intacct company ID. This ID is usually different for sandbox and production accounts. |
| Location ID | Enter your Intacct location ID. This may help you narrow your data request to a specific location. |
| Max Concurrent Connections | Enter the number value for the maximum number of concurrent connections that Intacct allows for your account. If you have increased your API rate limits with Intacct, specify how many concurrent connections you are allowed here. |
Details Pane
This pane contains a primary Reports menu, along with various other menus which may or may not appear depending on the report type you select.| Note: There might be a possibility of having other/additional supported values for Reporting Period. Contact Sage Intacct for other possible Reporting Duration values for filtering the data. | |
| Date Filter | Select whether you want to filter results by the date of creation or the date when they were last modified. |
| Page Size | Select the page size. It must be between 10 and 250. The page size number limits how much data is consumed from the API at once. If you are receiving an error, try decreasing the page size. |
| Custom Report Name | Enter the custom report name. |
| Filter Data | Select this checkbox if you’d like to filter your custom report by date. If your report supports date filtering, you’ll be able to select options to set the date range. |
| Filter Arguments | Filter Arguments give you options to filter the custom report by a specific or relative date range, or by a reporting period such as ‘Current Month’ or ‘Current Year’. If your custom report does not support date filters, this drop down will be empty. |
| Module Key | Select a module key. |
| Date | Specify whether the report’s data is for a single date or a range of dates.
|
| Start Date - Relative - Days Back | Choose the day for which you would like to start receiving the data by entering a number relative to today. For example, enter 1 for yesterday, 7 for 1 week ago, and 30 for 1 month ago. |
| End Date - Relative - Days Back | Choose the day for which you would like to stop receiving data by entering a number relative to today. For example, enter 1 for yesterday, 7 for 1 week ago, and 30 for 1 month ago. |
| Single date - Relative - Days Back | Specify the number of days before today for which you would like to receive the data. For example, enter 0 for today or 7 for seven days ago. |
Other Panes
For information about the remaining sections of the connector interface, including how to configure scheduling, retry, and update options, see Adding a DataSet Using a Connector.Troubleshooting
- The biggest pitfall with this connector is credentials. Often, the username or password is wrong and the connector will fail. See Prerequisites to get the right information.
-
If you cannot authenticate, even with correct credentials, you may need to enable the XML Gateway API for your company. To do this, follow these instructions:
- Log into Sage Intacct.
- Mouse over the Company tab.
- Click the plus button next to Users.
-
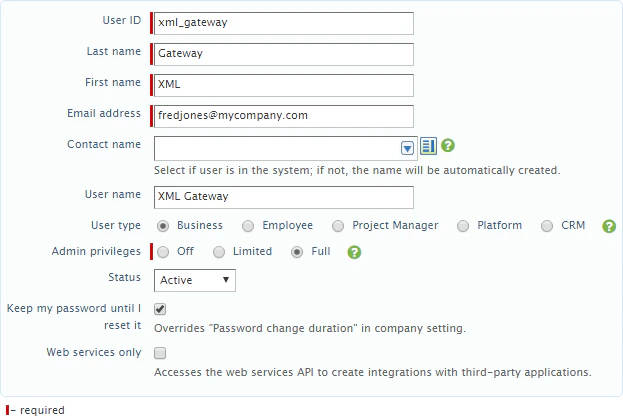
Fill in the fields as follows:
- User ID: Enter xml_gateway.
- Last Name: Enter Gateway.
- First Name: Enter XML.
- Email address: Enter your own email address.
- User Type: Select Business.
- Admin Privileges: Select Full.
-
Check the box that reads “Keep my password until I reset it.”
-
Do one of the following:
-
If you use roles…
- Open the Roles Information tab.
- Click in row 1 to show a dropdown menu.
- Select the role that should have full access in your system (most likely Admin).
-
If you are not using roles…
- Save your changes.
- Give the user the proper subscriptions.
-
If you use roles…
- Click Save. This sets up the user. Sage Intacct now sends an email with a temporary password to the email address you specified. You should now be able to use this user to log into the Connector interface in Domo.